从零开始搭建你的免费 BLOG 博客(Github+Cloudflare)
基于 GitHub 与 Cloudflare 的静态站点部署方案(Hugo)
前言
由于我是长期 VPS 服务器的持有用户,最开始我尝试使用阿里云的 VPS 服务器作为平台作为Hugo Blog站点,随着部署的过程和最终的效果呈现,我觉得存在以下几方面的问题:
- 性能受限于 VPS 的性能配置;
- 使用 HTTPS,需要在 WEB 服务上配置 https 证书;
- 发布内容繁琐复杂,后台数据更新不够及时,依赖于脚本;
- 网页可靠性较低;
- 与 VPS 其他部署的服务部分处在冲突。
最后我选择 GitHub Pages 配合 Cloudflare 托管的方案实现 BLOG 的搭建。可以解决以上所以问题,重要的是免费!
GitHub + Cloudflare
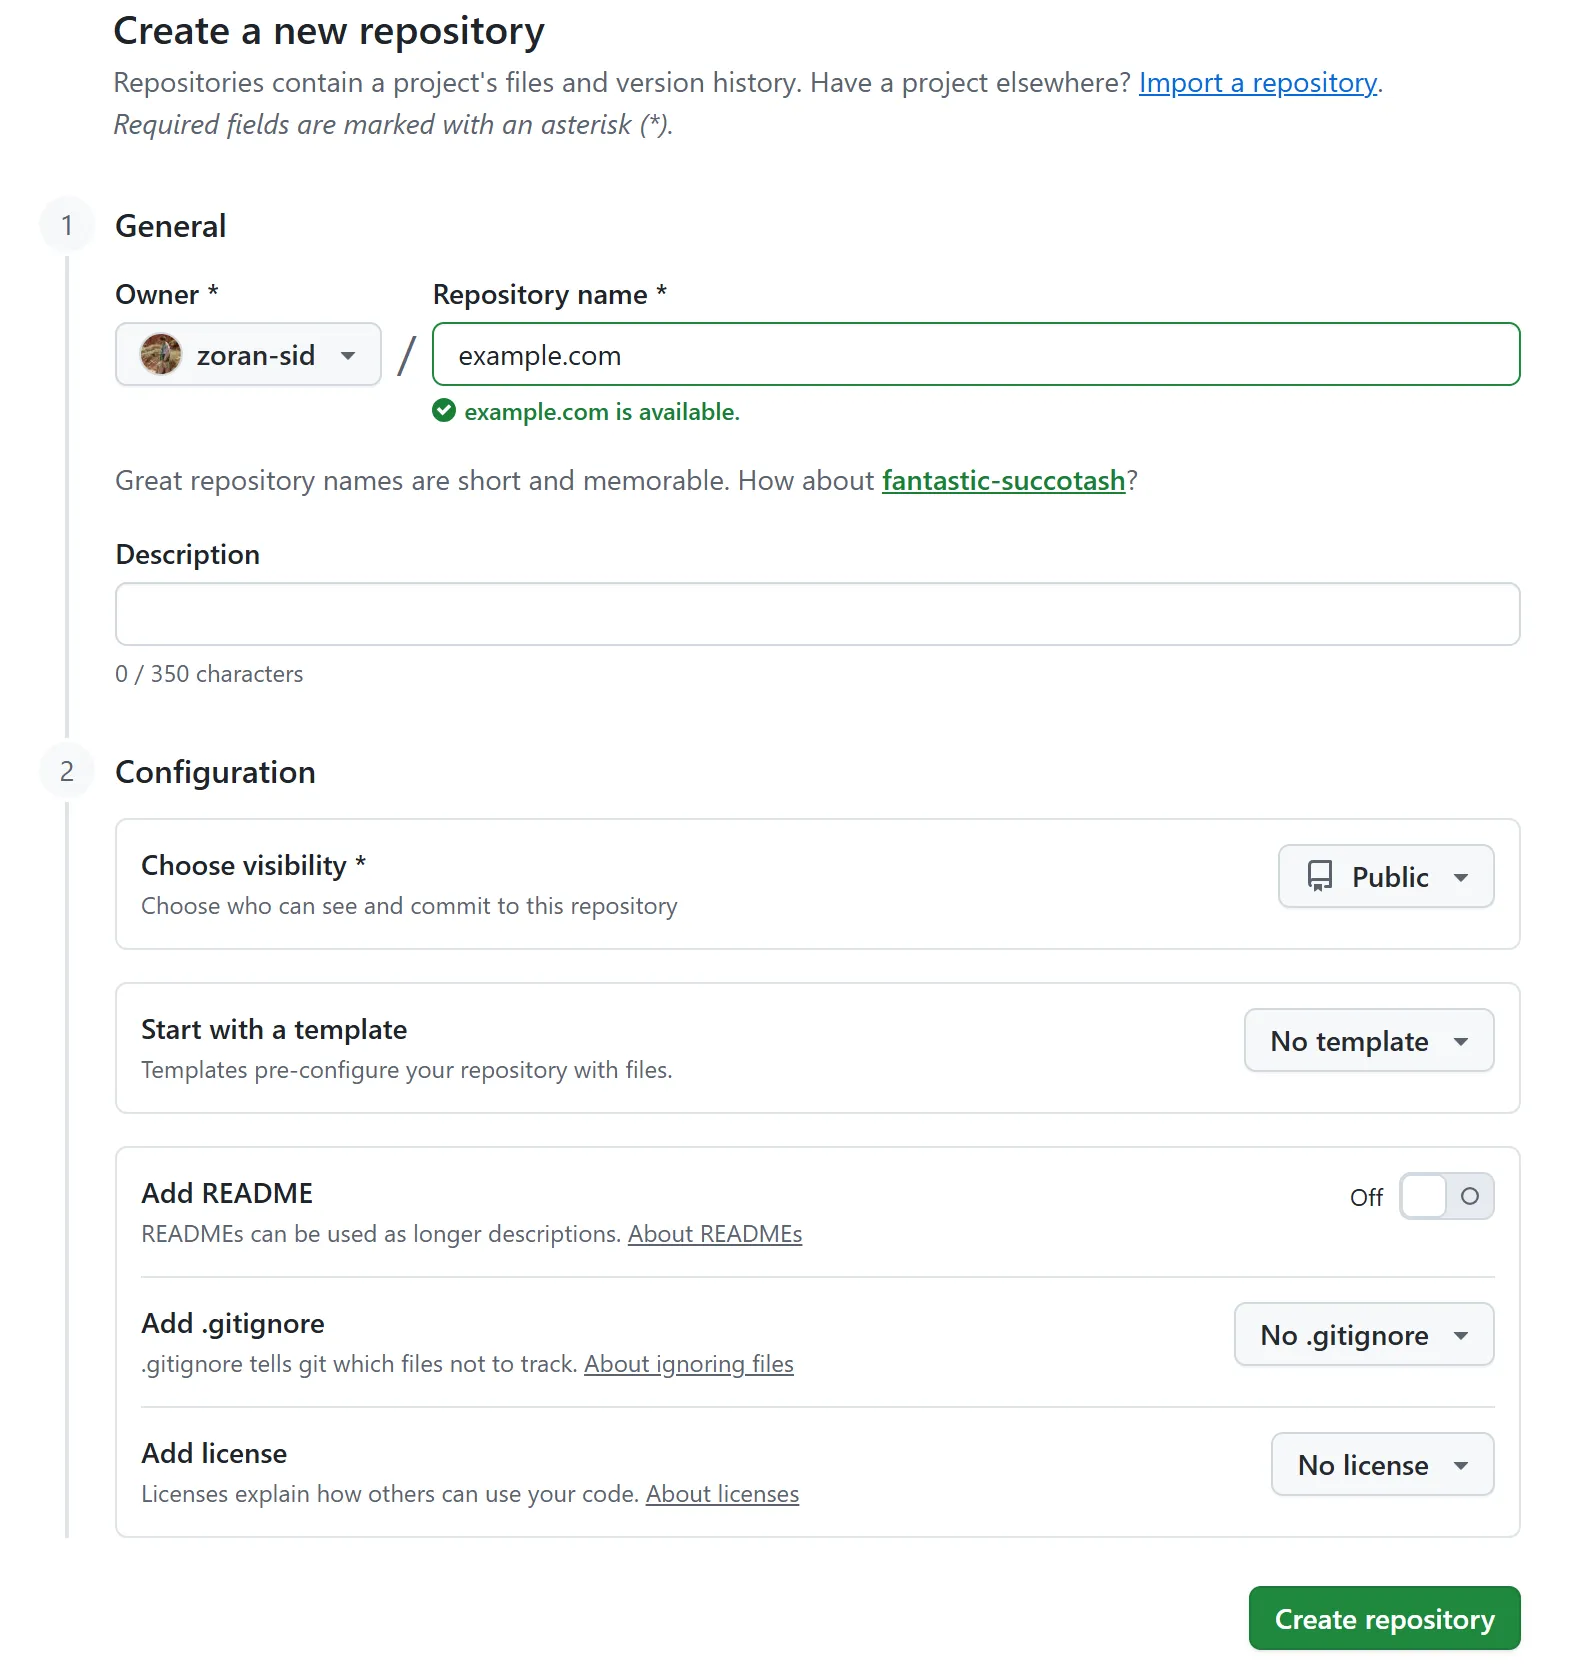
注册配置 GitHub 仓库
Respsitory name: example.com (自定义填写Blog网站的仓库名)
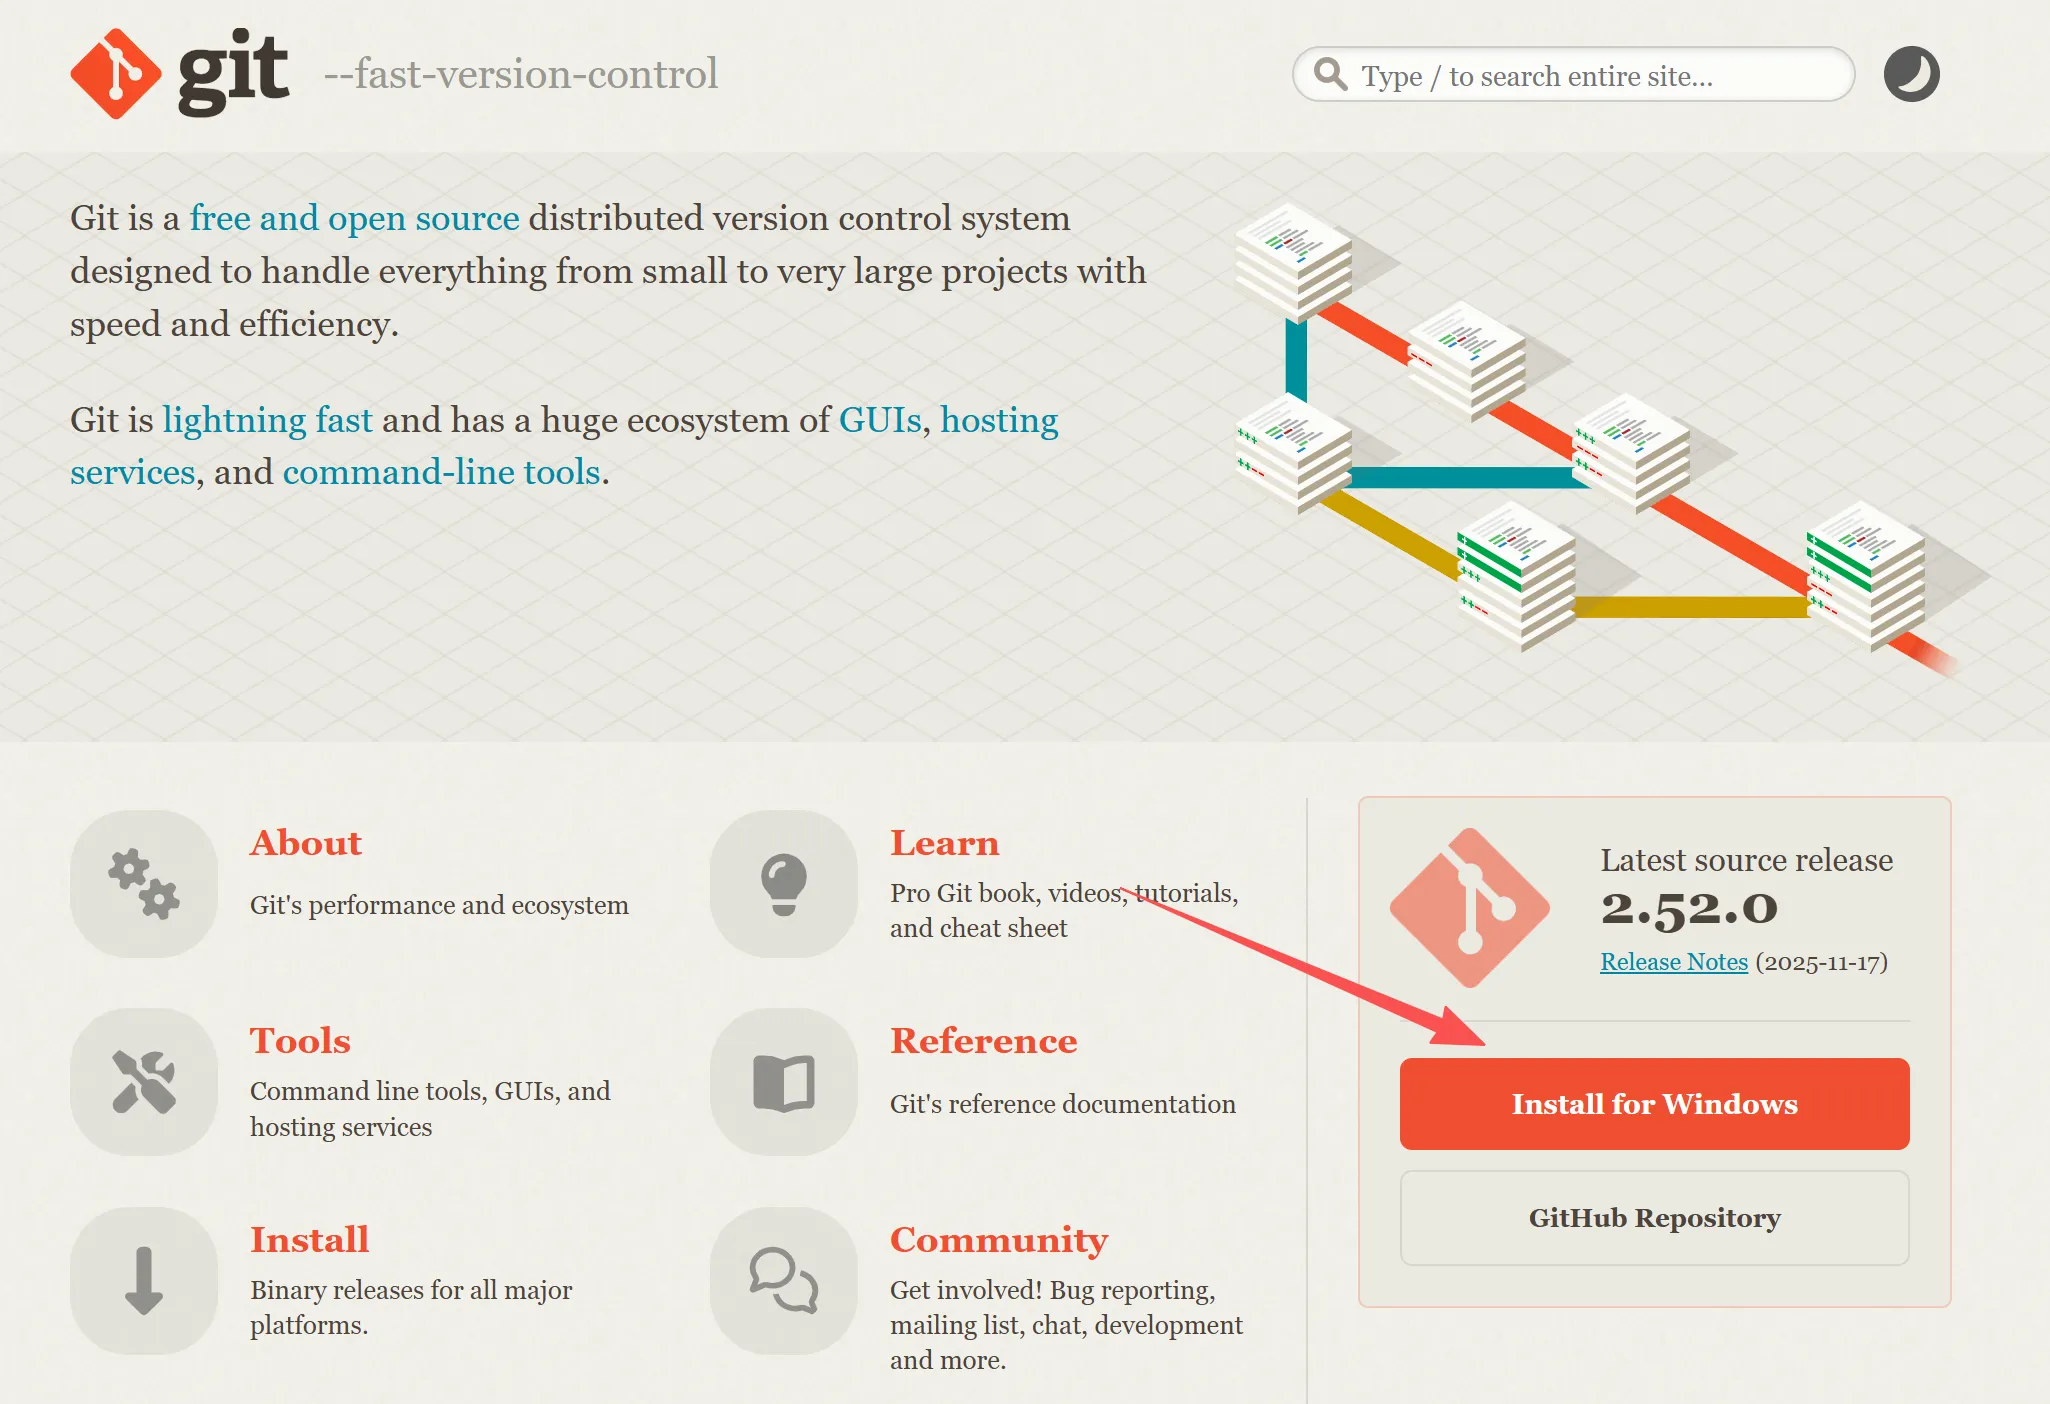
安装 Git
安装 Git
后续为了方便本地化管理 GitHub仓库。
官网地址:https://git-scm.com/
本地 SSH 秘钥
在 Windows 本地使用 cmd 生成本地 SSH 秘钥
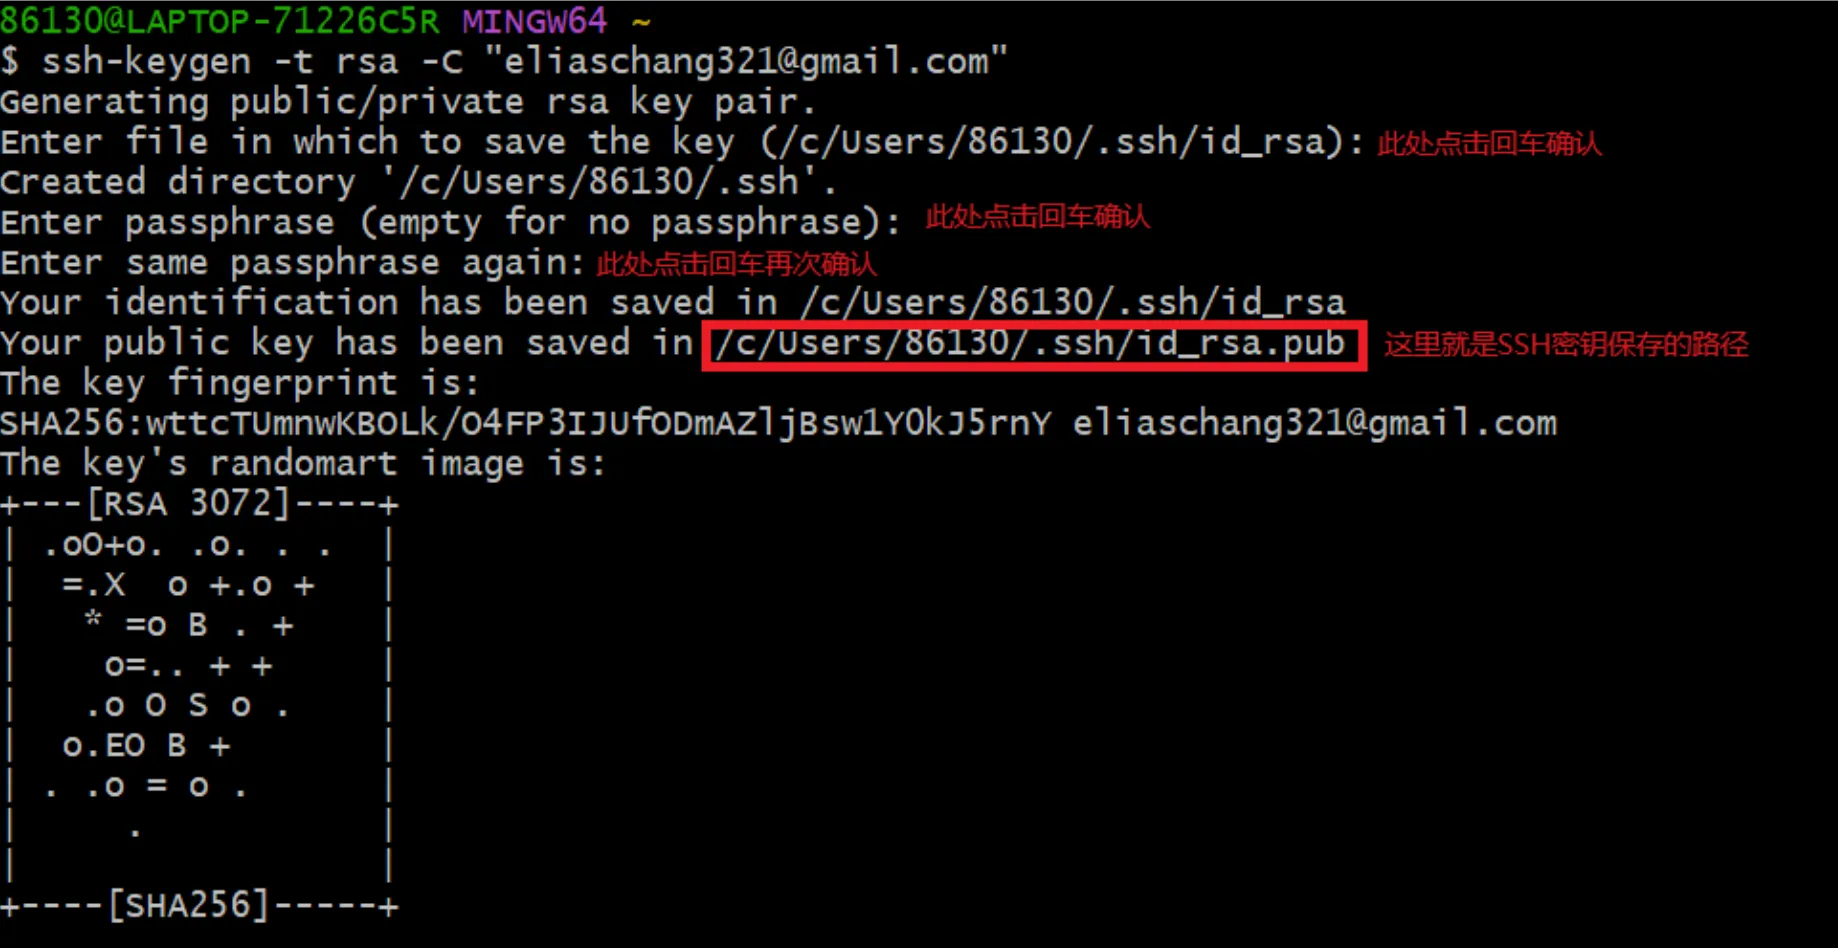
设置 SSH keys
在 GitHub 设置的 SSH and GPG keys 中填写生成的秘钥 SSH Keys

之后就可以通过 Git 命令,https 上传文件到仓库了~
Hugo 主题
在 Hugo themes 中挑选自己合适的主题,作为BLOG的模版。
https://themes.gohugo.io/
本网站主题如下:
https://github.com/reorx/hugo-PaperModX
Git 拉取仓库
git clone https://github.com/reorx/hugo-PaperModX.git
文件格式
- content:存储posts等
- data:社交媒体的配置
- layouts:整个静态网页的布局(重要!)
- assets:存储 css,js 文件,默认 toml 拉取头像
- i18n:多语言
- 我这里选择覆盖 ExampleSite 和仓库根目录,具体不同 theme 会有不同的配置方案。该教程不适配任何主题。
拉取文件到 GitHub
- git init :在此文件夹生成一个.git隐藏文件;
- git add . : 将文件添加到缓存区( 注意这个”.”,是有空格的,”.”代表这个test这个文件夹下的目录全部都提交,也可以通过git add 文件名 提交指定的文件);
- git status:查看现在的状态,也可以不看,随你啦,可以看到picture文件夹里面的内容都提交上去了;
- git commit -m “这里是注释”:提交添加到缓存区的文件;
- git remote add origin remote_url : 添加新的git方式的origin, github上创建好的仓库和本地仓库进行关联;
- git push origin main:推送文件到仓库。
注:
- 第4步可能会让你配置个人信息,否则无法推送文件,具体请看 CLI 提示。
- 确保推送的仓库主分支和 CLI 一致。
配置 toml 文件
title = "ZORAN"  //BLOG标题
baseURL = "https://zoranzhou.com/"  //主网站信息
languageCode = "en-us"
defaultContentLanguage = "en"
enableEmoji = true
ignoreErrors = ["additional-script-loading-error"]
disqusShortname = ""

[pagination]  //主页显示文章数量
pagerSize = 10

##############################
# Params
##############################
[params]
TocSide = "left"   //左对齐
EnableInstantClick = false  //这里因为加了waline方案,所以需要false,确保html正确的刷新出来

# --- Logo ---
[params.logo]
icon = "favicon.png" //存储在assets/favicon.png
iconWidth = 128
iconHeight = 128
text = ""

##############################
# Menu 确保导航分页都正常显示
##############################
[menu]

  [[menu.main]]
  name = "Home"
  url = "/"
  weight = 1

  [[menu.main]]
  name = "Blog"
  url = "/posts/"
  weight = 2

  [[menu.main]]
  name = "Archives"
  url = "/archives/"
  weight = 3
    [menu.main.params]
    external = false

# --- Social Icons --- 社交媒体配置
[[params.social]]
name = "github"
url = "xxx"

[[params.social]]
name = "twitter"
url = "xxx"

##############################
# Comments 评论区方案(可选)
##############################
[params.commentSystems.waline]
serverURL = "xxx" 评论区后台URL
locale = "en"

[params.defaultCommentSystems]
waline = true
其他常用属性
Theme Switch Toggle (白天夜晚主题相关)
Shows icon besides title of page to change theme
To disable it :
disableThemeToggle: true
You can refer following table for better understanding…
defaultTheme | disableThemeToggle | checks local storage? | checks system theme? | Info |
|---|---|---|---|---|
auto | true | No | Yes | only system theme |
| false | Yes (if not->2) | Yes (2) | switch present | |
dark | true | No | No | force dark only |
| false | Yes | No | switch present | |
light | true | No | No | force light only |
| false | Yes | No | switch present |
Archives Layout(存档页面布局)
Create a page with archive.md in content directory with following content
.
├── config.toml
├── content/
│   ├── archives.md   <--- Create archive.md here
│   └── posts/
 ── static/
and add the following to it
---
title: "Archive"
layout: "archives"
url: "/archives/"
summary: archives
---
注:Archives 布局不支持多语言月份翻译。
Search Page (搜索)
PaperModX uses Fuse.js Basic for seach functionality
Add the following to site config, config.yml
[outputs]
  home = ["HTML", "JSON","RSS"]
Create a page with search.md in content directory with following content.
---
title: "Search" # in any language you want
layout: "search" # is necessary
# url: "/archive"
# description: "Description for Search"
summary: "search"
---
To hide a particular page from being searched, add it in post’s fron’t matter
searchHidden: true
Share Buttons on post (分享按钮)
Displays Share Buttons at Bottom of each post
to show share buttons add
params:
    ShowShareButtons: true
Show post reading time (显示阅读时间)
Displays Reading Time (the estimated time, in minutes, it takes to read the content.)
To show reading time add
Params:
    ShowReadingTime: true
Show Table of Contents (Toc) on blog post (目录)
Displays ToC on blog-pages
To show ToC add following to page-variables
ShowToc: true
To keep Toc Open by default on a post add following to page-variables:
TocOpen: true
BreadCrumb Navigation (返回主页)
Adds BreadCrumb Navigation above Post’s Title to show subsections and Navigation to Home
params:
    ShowBreadCrumbs: true
Can be diabled for particular page’s front-matter
---
ShowBreadCrumbs: false
---
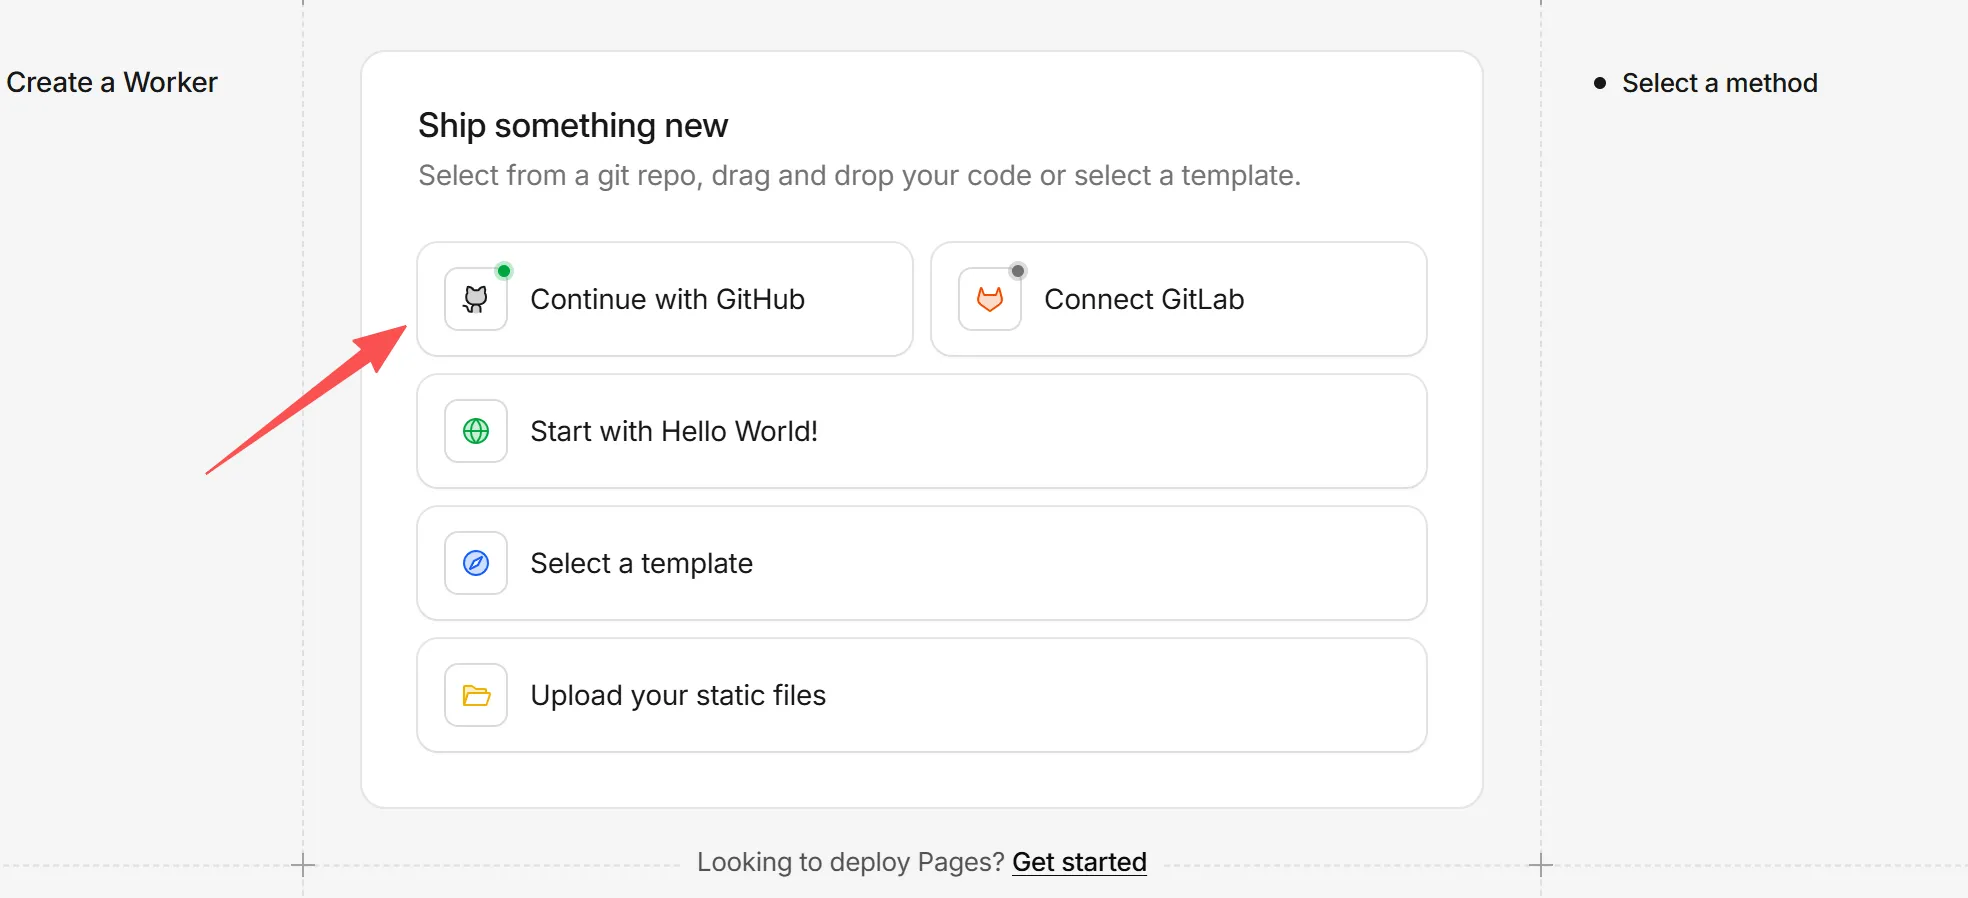
Cloudflare配置
Workers & Pages
配置workers & Pages
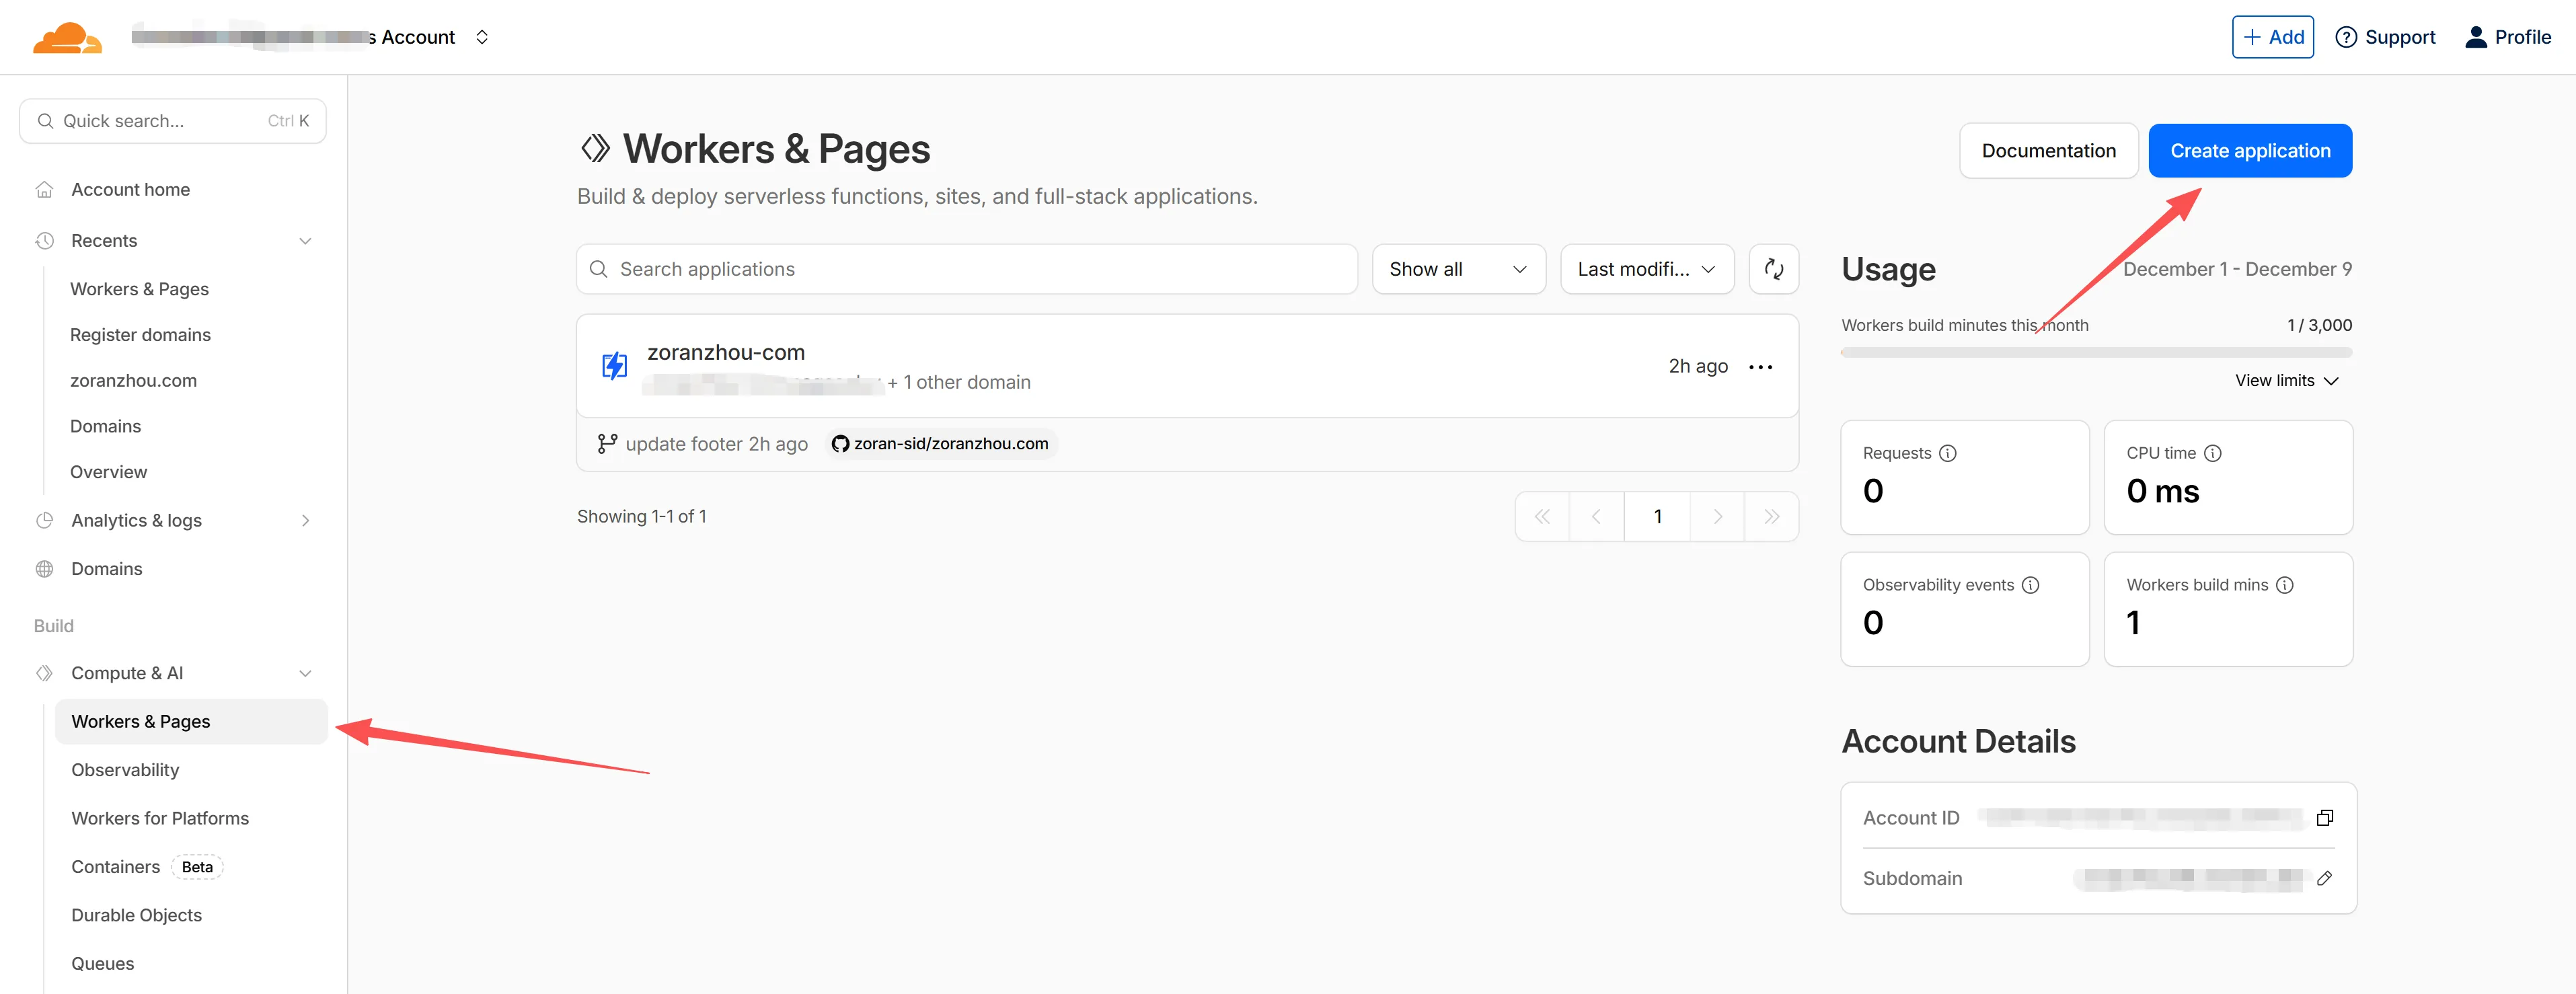
链接 GitHub 仓库
选择刚才创建好的仓库
Project name:随意
Production branch:选择正确的分支
Framework preset:选择Hugo
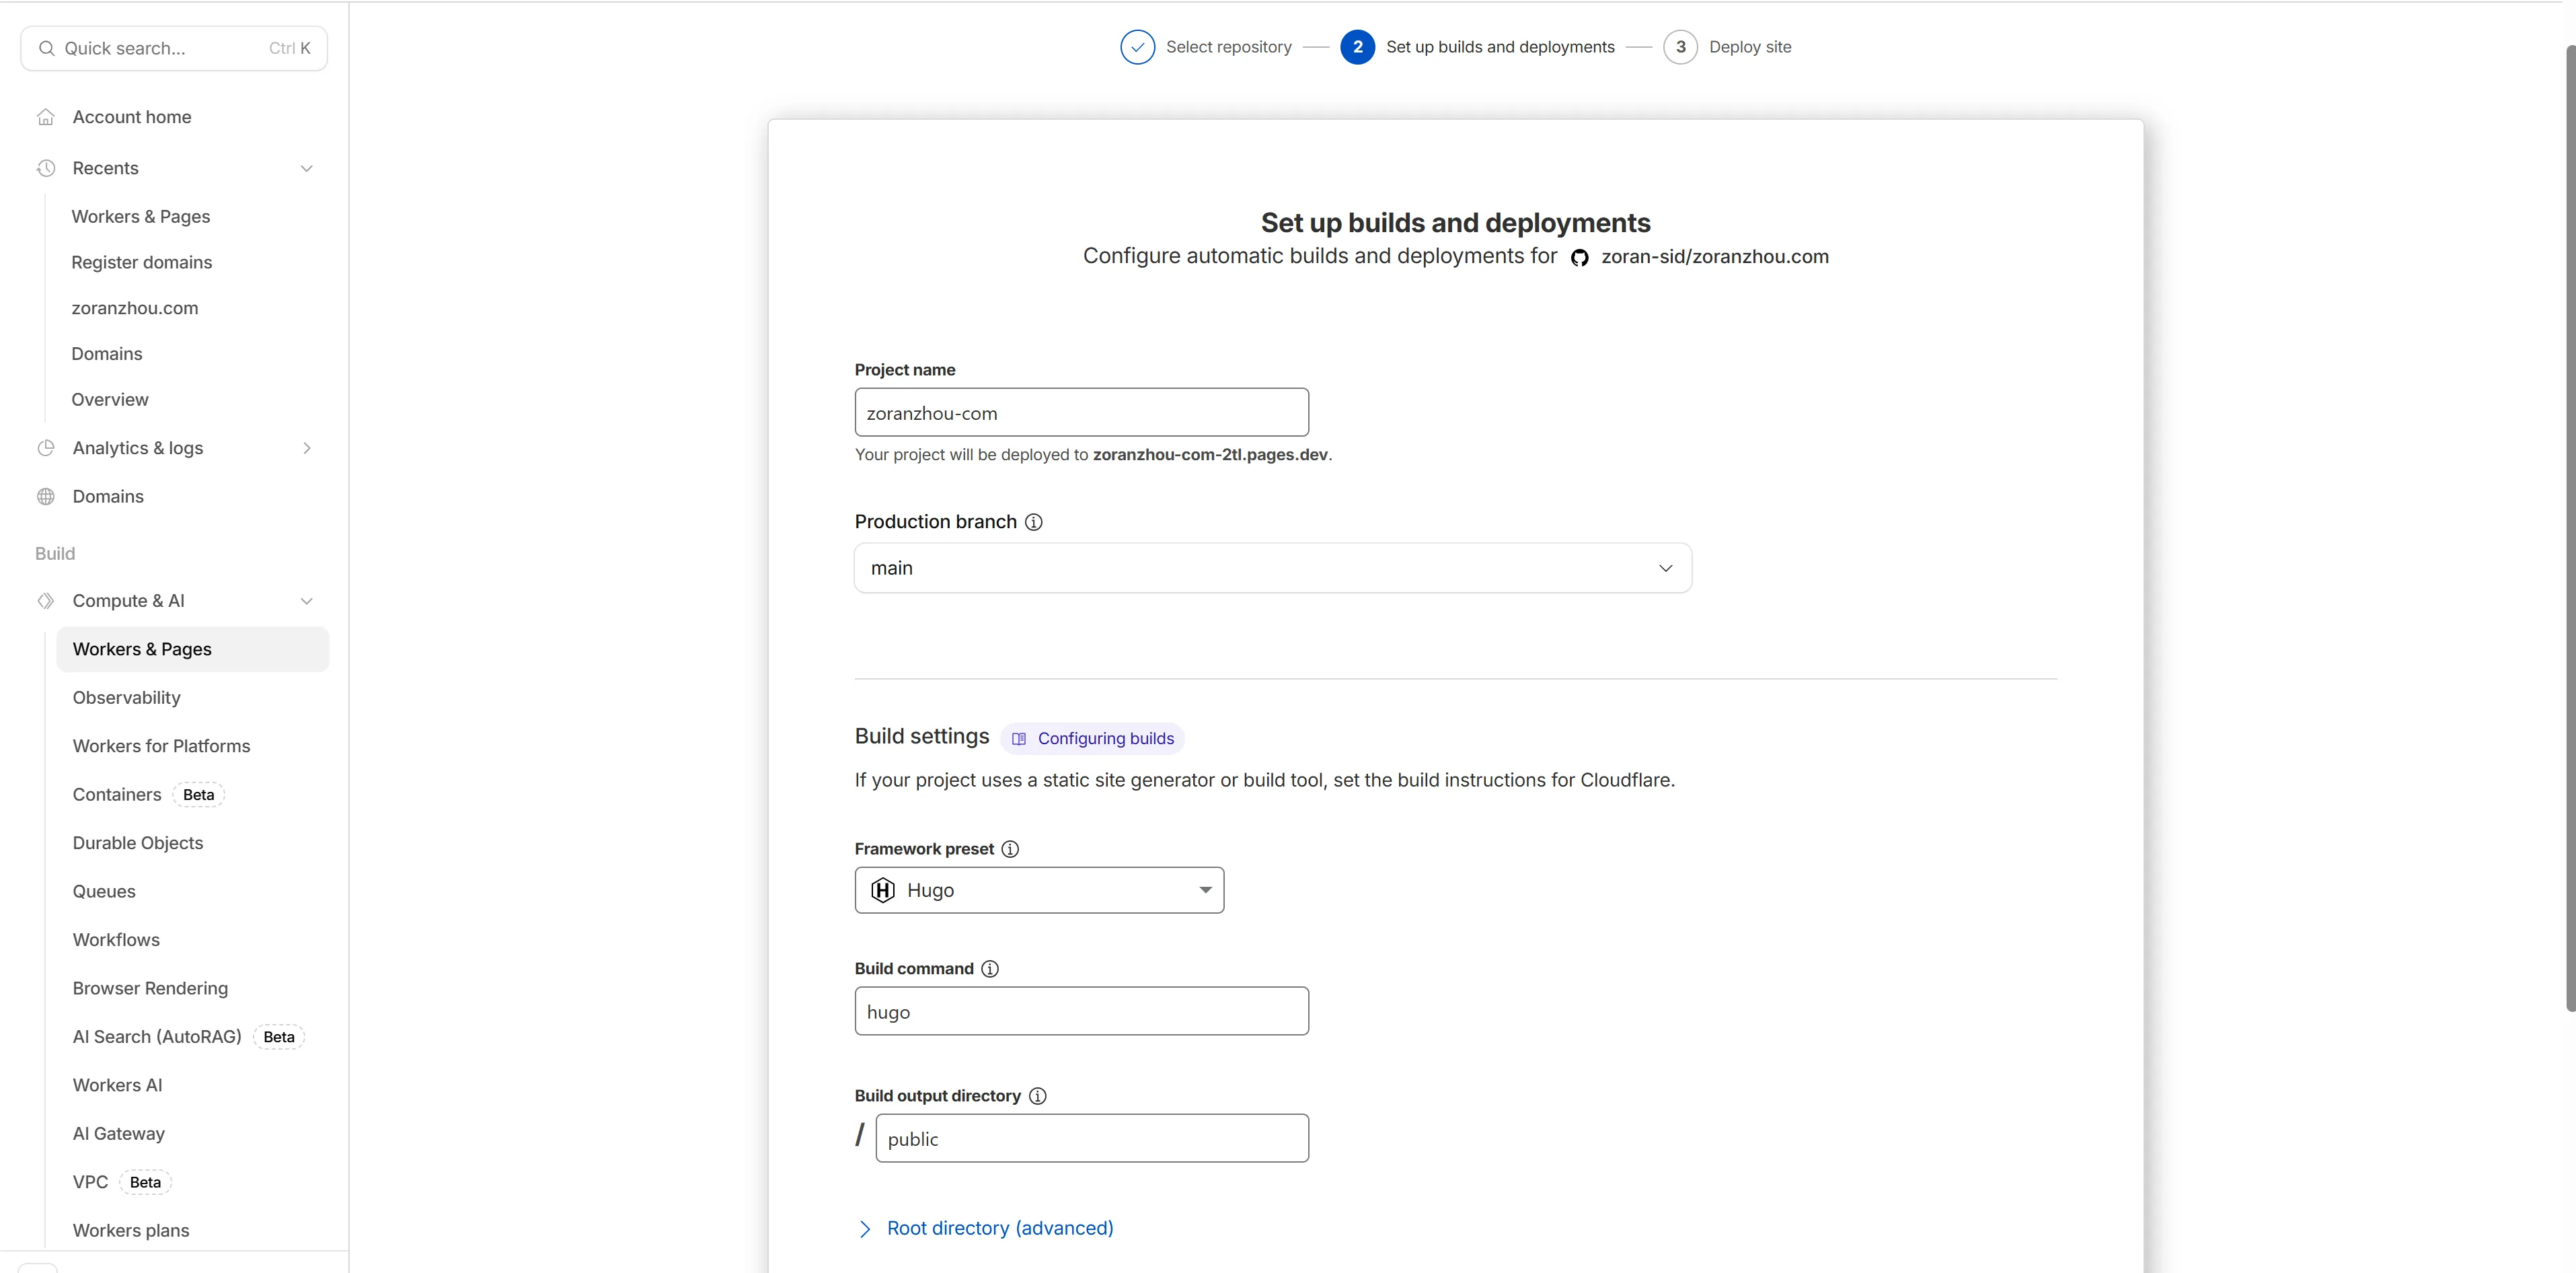
之后默认部署即可
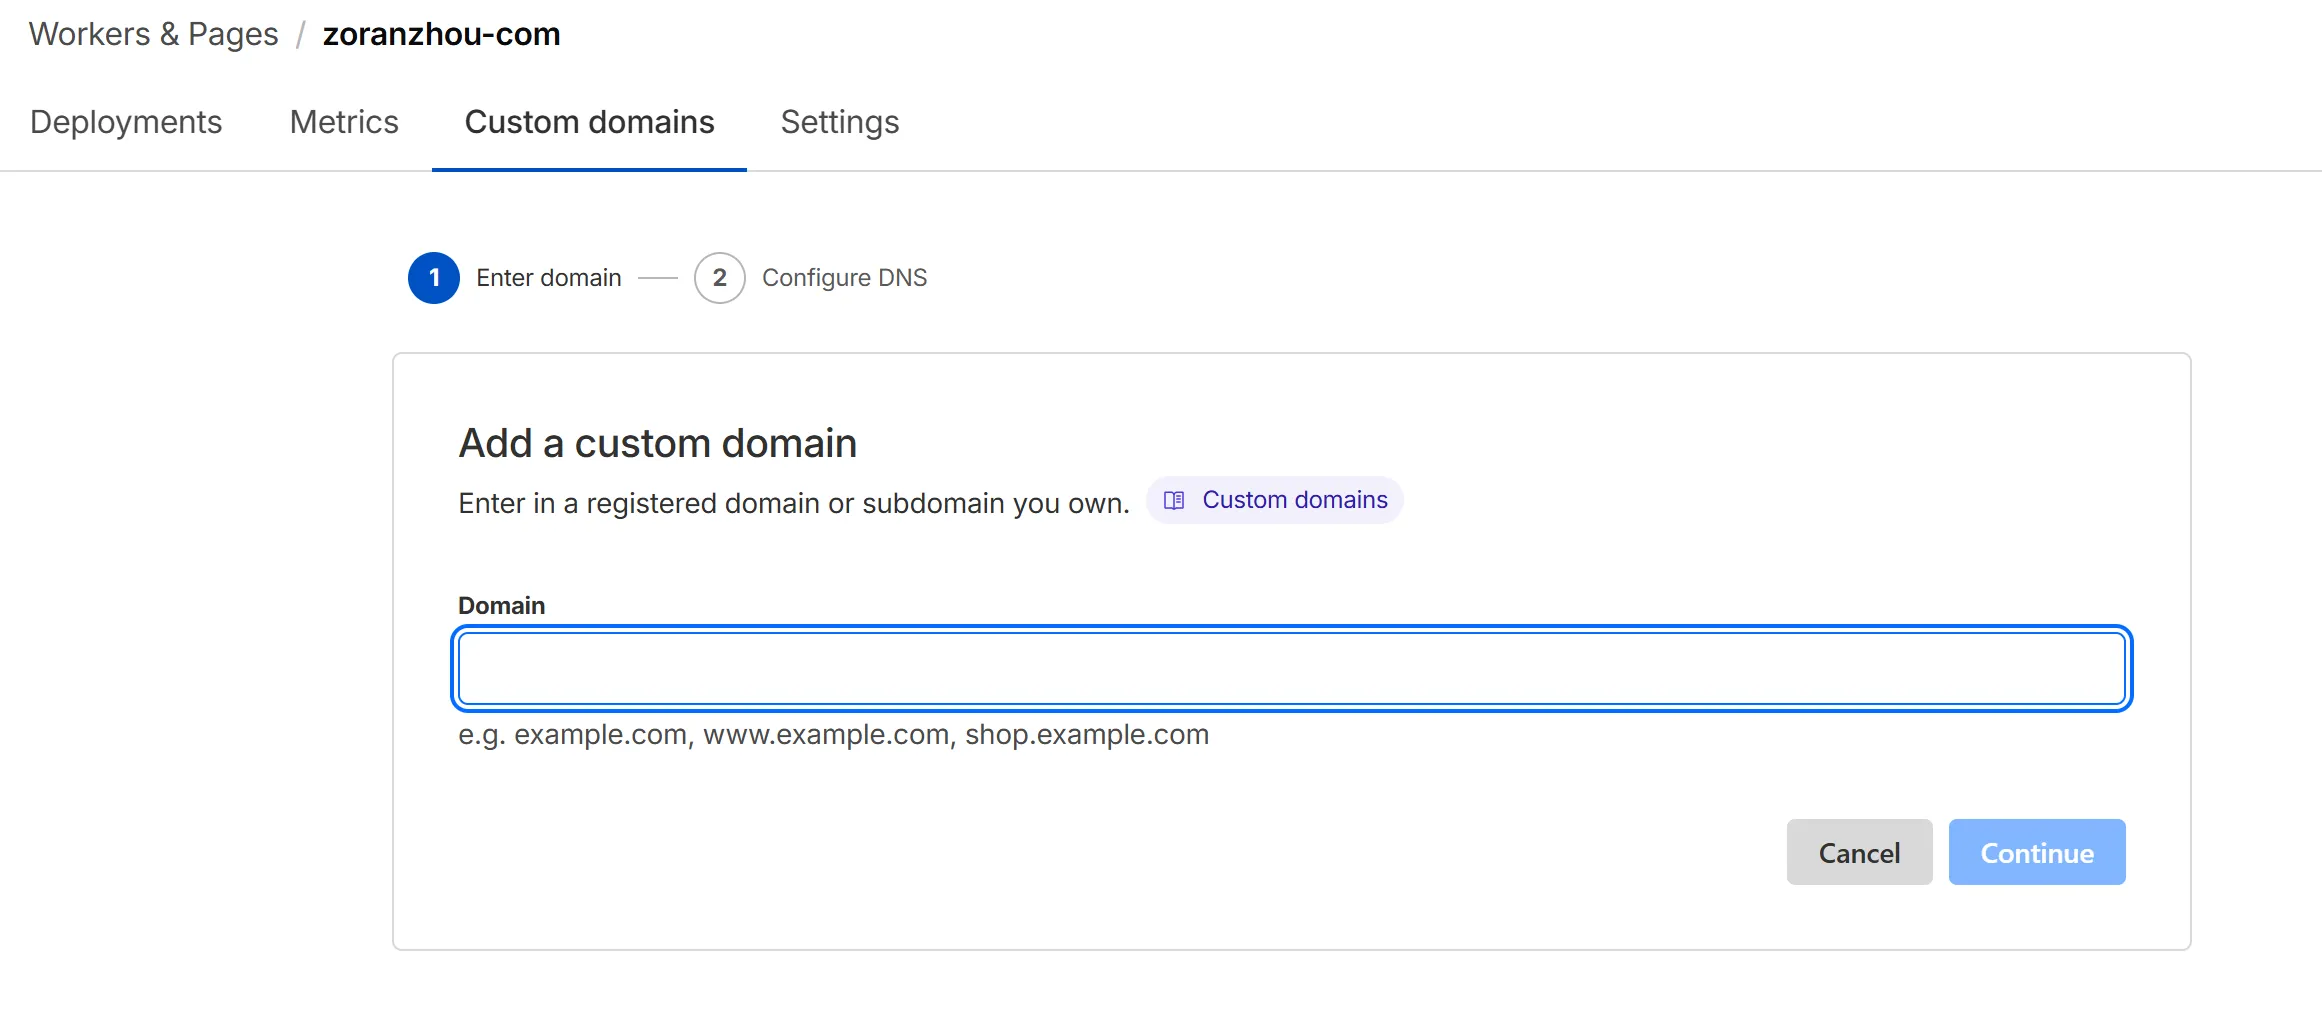
添加自定义域名
填写自己拥有的域名即可,Cloudflare会自动化处理。
最后就可以通过域名访问到 BLOG了!
Cloudflare R2 对象存储 + WebP Cloud 代理加速
随着博客内容的增加,图片资源的存储和加载速度成为影响用户体验的关键因素。这里介绍一套免费的图片存储与加速方案:Cloudflare R2 配合 WebP Cloud 代理。
为什么需要这套方案?
- GitHub 仓库限制:大量图片会增加仓库体积,影响克隆和部署速度
- 加载速度:直接从 GitHub 或 Cloudflare Pages 加载图片,跨国访问速度不稳定
- 格式优化:现代浏览器支持 WebP 格式,体积更小,加载更快
- 成本考量:R2 提供 10GB 免费存储,WebP Cloud 提供免费代理转换服务
Cloudflare R2 配置
R2 是 Cloudflare 提供的兼容 S3 API 的对象存储服务。
创建 R2 存储桶
- 登录 Cloudflare Dashboard,进入 R2 页面
- 点击 Create bucket,输入存储桶名称(如
blog-storage) - 选择存储桶位置,建议选 Automatic 让 Cloudflare 自动优化
配置公开访问
R2 默认是私有的,需要配置公开访问才能通过 URL 直接访问图片:
- 进入存储桶设置,找到 Public Access 选项
- 开启 Allow Public Access
- 绑定自定义域名(推荐):
- 在 Custom Domains 中添加你的子域名,如
images.yourdomain.com - 或者使用 WebP Cloud 提供的代理域名
- 在 Custom Domains 中添加你的子域名,如
获取 API 凭证
用于通过 API 上传图片:
- 进入 R2 → Manage R2 API Tokens
- 点击 Create API Token
- 选择 Object Read & Write 权限
- 复制 Access Key ID 和 Secret Access Key
API 连接信息示例:
Account ID: your-account-id
Access Key ID: your-access-key
Secret Access Key: your-secret-key
Bucket: blog-storage
S3 API Endpoint: https://your-account-id.r2.cloudflarestorage.com
上传图片到 R2
可以使用多种方式上传:
方式一:Cloudflare Dashboard 网页上传
- 适合偶尔上传少量图片
方式二:AWS CLI / boto3 脚本
- 适合批量上传和自动化工作流
import boto3

s3 = boto3.client(
    's3',
    endpoint_url='https://your-account-id.r2.cloudflarestorage.com',
    aws_access_key_id='your-access-key',
    aws_secret_access_key='your-secret-key',
    region_name='auto'
)

# 上传文件
s3.upload_file('local-image.jpg', 'blog-storage', 'image-20250101.jpg')
方式三:第三方工具(如 rclone、Cyberduck)
- 图形化界面,操作直观
WebP Cloud 代理加速
WebP Cloud(webp.fi)是一个免费的图片代理服务,可以自动将图片转换为 WebP 格式,并提供全球 CDN 加速。
配置 WebP Cloud
- 访问 WebP Cloud 官网
- 注册账号并添加你的 R2 存储桶作为源站
- 配置自定义域名(可选)
使用方式
假设你的 R2 图片原始链接是:
https://your-bucket.your-account-id.r2.cloudflarestorage.com/image.jpg
通过 WebP Cloud 代理后:
https://your-proxy.webp.fi/image.jpg
WebP Cloud 会自动:
- 将图片转换为 WebP 格式(浏览器支持时)
- 压缩图片体积
- 通过 Cloudflare CDN 全球加速
在博客中使用
在 Hugo 的 Markdown 文章中引用:

完整工作流示例
- 撰写文章时,将图片保存到本地
- 上传图片到 R2 存储桶
- 获取 WebP Cloud 代理链接
- 在 Markdown 中引用代理链接
- 部署博客,图片会自动通过 WebP Cloud 加速加载
成本与限额
| 服务 | 免费额度 | 超出后 |
|---|---|---|
| Cloudflare R2 | 10GB 存储/月 | $0.015/GB/月 |
| Cloudflare R2 | 100 万次请求/月 | $0.36/百万次 |
| WebP Cloud | 无限(目前免费) | 免费 |
对于个人博客来说,免费额度完全够用。
总结
这套方案的优势:
- ✅ 完全免费:R2 + WebP Cloud 对个人用户免费
- ✅ 全球加速:Cloudflare CDN 覆盖全球
- ✅ 自动优化:WebP 格式自动压缩,提升加载速度
- ✅ 兼容性好:S3 API 标准,工具生态丰富
- ✅ 与现有工作流集成:不影响 Hugo + GitHub + Cloudflare Pages 的部署流程
通过这套方案,你的博客图片可以实现快速、稳定、低成本的全球分发。